
�A��AP4050DN-E console��䛟o��AP�ܴa��ӛ������k��
�l���r�g:2025-04-02 ����Դ:xp���dվ �g�[:
| ·������Router�����B�Ӄɂ�������W�j��Ӳ���O�䣬�ھW�j�g��W�P�����ã����xȡÿһ���������еĵ�ַȻ��Q������͵Č��������ԵľW�j�O�䣬·��������Ҫ�Ĺ��ܞ錍�F��Ϣ���D�͡� һ���͑����� �A��AP4050DN-E console��䛟o��AP�ܴa��ӛ����ô�k�� console��䛟o��APҪ�ܴa�� 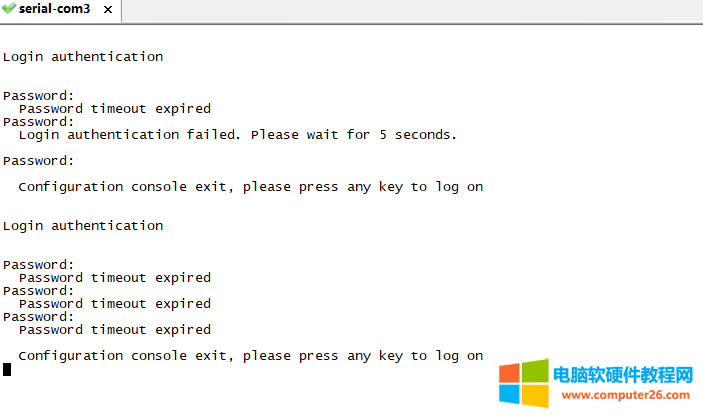 ��λ֏��A��AP4050DN-E 4:�҃ȵ��ܶ� 0:�����쾀1�����쾀 5���ڶ���AC�aƷ 0���A��λ D:�p�l N����ͨ�쾀E�������쾀 ������Q�k�� ��һ�N��Q�k�����L��Default���o ��������ܴa���z����������Default���o���O�䣬�����L��Default���o3s���ϻ֏ͳ��S���ã��O����Ñ������ܴa���֏͞�ȱʡֵ�����ڛ]��Default���o���O�䣬Ո�����½�Q�k���� 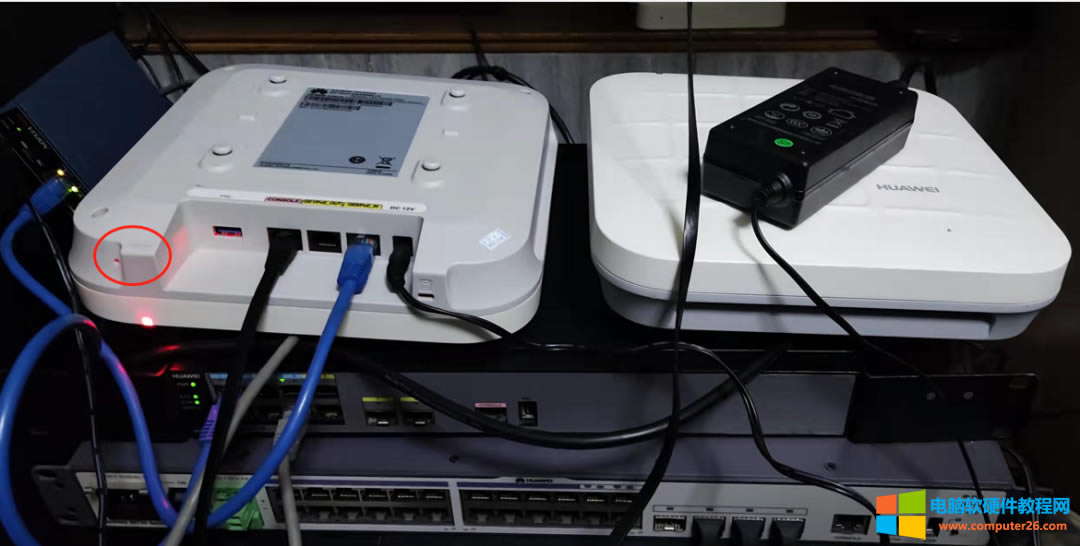 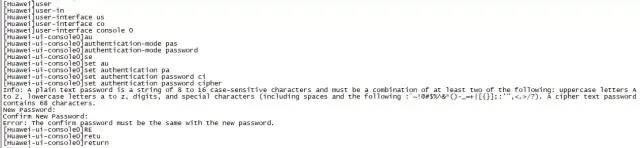 ����ֱ�ӻ֏ͳ��S�O�á� �����ܴa��һ��Ҫ���档 �ڶ��N�ƽⷽ������BIOS���������^Console���ܴa���Ӻ������O��Console���ܴa �O���BIOS�ṩ���������^Console���ܴa���ӵĹ��ܣ��������Ñ�ʹ��Console�ڵ�䛵ĕr�����^�ܴa�z�顣�@��ϵ�y���Ӻ���˲���Ҫݔ��Console�ܴa�⣬�c����������ͬ��Ҳ������������ü��d���O�䆢�Ӻ���Console���ܴa��Ȼ�����á� ���^�ܴa�z����ڰ�ȫ�L�U��Ո�ձر��������BootROM�ܴa�� Ҫ�M�뵽BIOS�ˆ���Ҫ�؆��O�䣬�����I���Д࣬Ոҕ���w��r�����O�䔵����ݣ����M���x��I�����^�ٵĕr�g������ ���Console���ܴa��䛺�Ո�R�������µ��ܴa����t��䛳��r���؆�������Ҫ����ܴa����䛡� �ڴ˲����^���в�Ҫ���O���M����늡� �ô��ھ��B�Ӳ��؆��O�䣬���F“Press CTRL+B to enter BIOS menu”��ӡ��Ϣ�r������“Ctrl+B”���I���ܴa���M��BIOS���ˆΡ� �ô��ھ��B���O��ķ���Ո��Ҋͨ�^Console���B���O�䡣 ��ͬ�汾��BootROM�ܴa���ܲ�ͬ�����w�Ʌ�ҊAC��AP��ȱʡ�Ñ������ܴa�� �������^Console���ܴa��䛡� ݔ��BIOS�ˆ���“Clear password for console user”��������̖�����Console���ܴa�� ݔ��BIOS�ˆ���“Boot with default mode”��������̖����ȱʡģʽ�����O�䡣 ���ϵ�y���Ӻ�ͨ�^Console�ڵ�䛕r����Ҫ�J�C����䛺���Console���ܴa����̎�Ե���J�Cģʽ��passwordģʽ���ܴa��“huawei 123”������ ��ͬ�汾���O�ñ�����C�ܴa������������ͬ�� <Huawei>system-view[Huawei]user-interface console 0[Huawei-ui-console0]authentication-mode password[Huawei-ui-console0]set authentication password cipher Enter Password <6-16> ://��̎��ʾ��Ϣ���O�䌍�H�@ʾ��� Confirm Password: [Huawei-ui-console0]return V200R002��֮ǰ�汾��set authentication password[cipher password] V200R003��֮��汾��set authentication password cipher ���˷�ֹ�؆������ÁGʧ������save��������á� �DƬ BIOS���ˆ� BIOS���ˆμ�����BIOS�������Ҫ���ܣ��������b��ˆε���ڡ� ͨ�^Console���B���O�䡣 �DƬ Console���B�ӷ�ʽՈ��Ҋ�����Ñ�ͨ�^Console�ڵ���O�䡣 �؆��O�䣬���O����F��ʾ��Ϣ�r��Ctrl+B���M��BIOS���ˆΡ� BIOS���ˆ� BIOS���ˆμ�����BIOS�������Ҫ���ܣ��������b��ˆε���ڡ� ͨ�^Console���B���O�䡣 Console���B�ӷ�ʽՈ��Ҋ�����Ñ�ͨ�^Console�ڵ���O�䡣 �؆��O�䣬���O����F��ʾ��Ϣ�r��Ctrl+B���M��BIOS���ˆΡ� Press CTRL+B to enter BIOS menu:1 Password: Info:You are advised to change the password to ensure security. BIOS Menu Version:072 1.Boot with default mode 2.Enter serial submenu 3.Enter startup submenu 4.Enter ethernet submenu 5.Enter file system submenu 6.Modify BOOTROM password 7.Clear password for console user 8.Config HigMem to Flash Flag 9.Reboot Press CTRL+E to enter Diag menu Enter your choice 1-9 : ������4050DN-E���F���؆������Л]��CTRL+B�x헣������M��BIOS�ˆΡ� ������AP�� Welcome To HUAWEI Wlan World U-Boot 428 Apr-25-2017-06:18:05 BOOT:Secondary USB0:USB XHCI 1.00 0 Storage Device s found Press CTRL+T for Full Memory Test in 1 Seconds:0 Net:Ethernet Mac:4C-FA-CA-65-2F-E0 PHY ID1:0x4d PHY ID2:0xd0b1 ipq40xx_ess_sw_init done eth0 Boot Kernel A Address:0x1c9e000 Boot Kernel B Address:0x3c9e000 Start Up time s :1 Image:Current Bootup is B Image:Current Bootup is B POST test:Begin Testing DDR:Passed. Testing Nor Flash:Passed. Testing PHY0:Passed. Testing PHY1:Passed. Testing PHY2:Passed. Testing PHY3:Passed. Testing PHY4:Passed. Saving POST results:Done POST test:End Press f or F to stop Auto-Boot in 3 seconds:0 f��F ##Booting kernel from FIT Image at 84000000... Using'config 1'configuration Trying'kernel 1'kernel subimage Description:ARM OpenWrt Linux-3.10.62 Type:Kernel Image Compression:lzma compressed Data Start:0x840000e4 Data Size:1948139 Bytes=1.9 MB Architecture:ARM OS:Linux Load Address:0x80208000 Entry Point:0x80208000 Hash algo:crc32 Hash value:cab5b531 Hash algo:sha1 Hash value:29e596152b2ae74b7a7d37b0d28d0d262a759a8a Verifying Hash Integrity...crc32+sha1+OK ##Flattened Device Tree from FIT Image at 84000000 Using'config 1'configuration Trying'fdt 1'FDT blob subimage Description:ARM OpenWrt qcom-ipq40xx-ap.dk01.1-c1 device tree blob Type:Flat Device Tree Compression:uncompressed Data Start:0x841dbc14 Data Size:33752 Bytes=33 KB Architecture:ARM Hash algo:crc32 Hash value:5d5bb06e Hash algo:sha1 Hash value:4fe758c0eeecbf794464de6bbd24470454be60e6 Verifying Hash Integrity...crc32+sha1+OK Booting using the fdt blob at 0x841dbc14 Uncompressing Kernel Image...OK Loading Device Tree to 87223000,end 8722e3d7...OK ipq:fdt fixup unable to find compatible node Linux version 3.10.62-ltsi-WR6.0.0.21_standard root SZV1000141398 gcc version 4.8.1 GCC #1 SMP PREEMPT Tue Apr 25 06:03:45 CST 2017 CPU:ARMv7 Processor[410fc075]revision 5 ARMv7 ,cr=10c5387d CPU:PIPT/VIPT nonaliasing data cache,VIPT aliasing instruction cache Memory policy:ECC disabled,Data cache writealloc Built 1 zonelists in Zone order,mobility grouping on.Total pages:61696 Kernel command line:console=ttyMSM0,9600n8 root=/dev/mtdblock22 rootfstype=squashfs rdinit=/sbin/init clk_ignore_unused FWD_MEM:aligned address c8000000 FWD_MEM:88000000 FWD_MEM:Allocating 68MB 17408 pages of memory at addr c8000000 Memory:170852k/170852k available,91292k reserved,0K highmem Virtual kernel memory layout: vector:0xffff0000-0xffff1000 4 kB fixmap:0xffc00000-0xfff00000 3072 kB vmalloc:0xd0800000-0xff000000 744 MB lowmem:0xc0000000-0xd0000000 256 MB pkmap:0xbfe00000-0xc0000000 2 MB modules:0xbf000000-0xbfe00000 14 MB .text:0xc0208000-0xc06c6e5c 4860 kB .init:0xc06c7000-0xc06e8d80 136 kB .data:0xc06ec000-0xc0738bc0 307 kB .bss:0xc0738d48-0xc07b5074 497 kB CPU1:Booted secondary processor CPU2:Booted secondary processor CPU3:Booted secondary processor SCSI subsystem initialized msm_serial_hsl_probe:Bus scaling is disabled sps:BAM device 0x07884000 is not registered yet. 23 ofpart partitions found on MTD device spi0.0 Creating 23 MTD partitions on"spi0.0": 0x000000000000-0x000000040000:"0:SBL1" 0x000000040000-0x000000080000:"0:MIBIB" 0x000000080000-0x000000100000:"0:QSEE" 0x000000100000-0x000000140000:"0:CDT" 0x000000140000-0x000000180000:"0:DDRPARAMS" 0x000000180000-0x000000280000:"0:APPSBL" 0x000000280000-0x0000002c0000:"0:ART" 0x0000002c0000-0x000000300000:"0:APPSBLENV" 0x000000300000-0x000000380000:"ResultA" 0x000000380000-0x000000600000:"configA" 0x000000600000-0x000000700000:"bootimageA" 0x000000700000-0x000002000000:"SysImageA" 0x000002000000-0x000002040000:"1:SBL1" 0x000002040000-0x000002080000:"1:MIBIB" 0x000002080000-0x000002100000:"1:QSEE" 0x000002100000-0x000002140000:"1:CDT" 0x000002140000-0x000002180000:"1:DDRPARAMS" 0x000002180000-0x000002280000:"1:APPSBL" 0x000002280000-0x000002300000:"Reservel" 0x000002300000-0x000002380000:"ResultB" 0x000002380000-0x000002600000:"configB" 0x000002600000-0x000002700000:"bootimageB" 0x000002700000-0x000004000000:"SysImageB" Concatenating MTD devices: 0 :"configA" 1 :"configB" into device"configA_merge" Concatenating MTD devices: 0 :"1:SBL1" 1 :"1:MIBIB" 2 :"1:QSEE" 3 :"1:CDT" 4 :"1:DDRPARAMS" 5 :"1:APPSBL" into device"UBOOT" QCE50:__qce_init_clk:Unable to get CE core src clk,set to NULL bus_scale_table is NULL Registering SWP/SWPB emulation handler clk:Not disabling unused clocks Bad inittab entry at line 10 Bad inittab entry at line 11 starting pid 89,tty'':'-/etc/init.d/rcS' MIMC_KERNEL:Module init. diag_log:module license'unspecified'taints kernel. Disabling lock debugging due to kernel taint bsp_adapter module:init Insmod I2C Initializing arch flag Done. ipq40xx-pinctrl 1000000.pinctrl:pin GPIO_63 already requested by 1000000.pinctrl:63;cannot claim for 1000000.pinctrl:63 ipq40xx-pinctrl 1000000.pinctrl:pin-63 1000000.pinctrl:63 status-22 /etc/rcS.d/S10startup.sh:line 46:can't create/sys/devices/soc.0/1000000.pinctrl/gpio/gpio63/direction:nonexistent directory ess-switch DT exist! switchreg_base_addr:0xc000000 switchreg_size:0x80000 switch_access_mode:local bus wan bmp:0x20 ess-psgmii DT exist! mac mode=0 current mac mode=0 current dts led_source_num is 0 mdio DT exist! ssdk_plat_init start enable ess clk reset ok in probe! chip_ver is 0x14 PHY ID is 0x4dd0b1 qca probe malibu phy driver succeeded! Dakota Chip version 0x1401 qca-ssdk module init succeeded! ########32Bit Kernel########## ########MSS Memory Device register success######## MSS_PUB Version[1.07],build on Date:[Apr 24 2017],Time:[22:19:09] edma module_init Insmod ipq eth module OK. Drv_ap_api module:Init jffs2:notice: 137 jffs2_build_xattr_subsystem:complete building xattr subsystem,0 of xdatum 0 unchecked,0 orphan and 0 of xref 0 dead,0 orphan found. wifi pub bdinfo attach success ProductName:AP4050DN-E ProductId:61 WirlessMac:4cfa-ca65-2fe0 CountryStr:CN CountryCode:156 BoardMaxUserNum:256 RadioId:0 RadioMaxNodeNum:160 RadioMaxUserNum:128 RadioId:0 DrvType:2 FlashFreqband:0 RadioId:1 RadioMaxNodeNum:160 RadioMaxUserNum:128 RadioId:1 DrvType:2 FlashFreqband:1 set ulMcThValue:512 Init wmi buf pool,11ac_radio_num[2],pool_size[800] hal stub init rate stub init 377+0 records in 377+0 records out 12064 bytes 11.8KB copied,0.098651 seconds,119.4KB/s 377+0 records in 377+0 records out 12064 bytes 11.8KB copied,0.172973 seconds,68.1KB/s ol_ath_ahb_probe device_name=a000000.wifi device_Id=-1 ol_ath_ahb_probe:io resource start:0xa000000,mem=0xd1c00000 __ol_ath_attach Allocated scn ce3c04c0 ol_ath_ahb_configure:MSI addr:0b006040,MSI base:00000040 Wifi0 CPU frequency 250000000 ol_ath_ahb_configure:num_desired MSI set to 0 Using Legacy Interrupt Waiting for target init Done waiting Atheros Attach:dev name wifi0,radio id:0 ol_transfer_bin_file[4238]Get Caldata for wifi0. __adf_os_fs_read[42],Open File/tmp/wifi0.caldata SUCCESS!! file system magic:-2054924042 super blocksize:4096 inode 3075 file size:12064 Warning:No board id matched.Selecting default boarddata file wifi0:Selecting board data file name boarddata_0.bin ol_ath_service_ready_event[4368]WAPI MBSSID 2 ol_ath_smart_ant_attach:Firmware doest not support Smart Antenna. ol_ath_smart_ant_attach:Hardware doest not support Smart Antenna. init file type:0 address:0x400000 len:0x68000 init file type:1 address:0xc0000 len:0x40000 init file type:2 address:0x980000 len:0x50000 init file type:3 address:0x30000 len:0x7000 init file type:4 address:0x43000 len:0x3000 init file type:5 address:0x4a000 len:0x5000 init file type:6 address:0x80000 len:0x6000 init file type:7 address:0x3f000 len:0x3000 ath_adhoc_netlink_init[118] huawei probe success radio:wifi0 ol_ath_ahb_probe device_name=a800000.wifi device_Id=-1 ol_ath_ahb_probe:io resource start:0xa800000,mem=0xd2400000 __ol_ath_attach Allocated scn cdf004c0 ol_ath_ahb_configure:MSI addr:0b006040,MSI base:00000050 Wifi1 CPU frequency 250000000 ol_ath_ahb_configure:num_desired MSI set to 0 Using Legacy Interrupt Waiting for target init Done waiting Atheros Attach:dev name wifi1,radio id:1 ol_transfer_bin_file[4238]Get Caldata for wifi1. __adf_os_fs_read[42],Open File/tmp/wifi1.caldata SUCCESS!! file system magic:-2054924042 super blocksize:4096 inode 1154 file size:12064 Warning:No board id matched.Selecting default boarddata file wifi1:Selecting board data file name boarddata_1.bin ol_ath_service_ready_event[4368]WAPI MBSSID 2 ol_ath_smart_ant_attach:Firmware doest not support Smart Antenna. ol_ath_smart_ant_attach:Hardware doest not support Smart Antenna. init file type:0 address:0x400000 len:0x68000 init file type:1 address:0xc0000 len:0x40000 init file type:2 address:0x980000 len:0x50000 init file type:3 address:0x30000 len:0x7000 init file type:4 address:0x43000 len:0x3000 init file type:5 address:0x4a000 len:0x5000 init file type:6 address:0x80000 len:0x6000 init file type:7 address:0x3f000 len:0x3000 ath_adhoc_netlink_init[118] huawei probe success radio:wifi1 Mount fsimage type:patch User fs folder:/opt Loop device:/dev/loop0 Mount folder:/mnt/patch cap32 start,build time 22:17:09 MSS_PUB Version[1.07],build on Date:[Apr 24 2017],Time:[22:17:06] Mss_Mem_Open:g_MssMemAddr=0x48000000,g_MssMemPhyAddr=0x88000000,g_vir2phy_off=0xffffffffc0000000 Module MEM Init......OK! Module DIAG Init......OK! Module PBUF Init......OK! Module IM Init......OK! Module IIC Init......OK! Module HAL Init......OK! Module Timer Init......OK! Module TIME Init......OK! MSS_Global_Init success! MSC Process run on core[3],PID=[184] MSC_TCTL_Init Succ!u32Ret=0 MSC goto scheduler! MSS_PUB Version[1.07],build on Date:[Apr 24 2017],Time:[22:19:09] MSS_PUB_Init Succ,ret=0 AP_Board_Cfg Succ,ret=0 Module MEM Init......OK! Module DIAG Init......OK! Module PBUF Init......OK! Module IM Init......OK! Module IIC Init......OK! Module HAL Init......OK! Module Timer Init......OK! Module TIME Init......OK! MSS_Global_Init Succ,ret=0 MSU Init OK MSU_Init Succ,ret=0 MSS_IM_InstGlobalInit Succ,ret=0 MSS_Local_Init Succ,ret=0 msu init success!compile time:22:04:24 VOS_Start...... PPI_DEV_SysInit begin. CDEV_InitProduct Success! DEV_EVT_InitEvtData Success! PPI_DEV_SysInit End. Task GRSA Init......Ok......OK VRP_SockTm_Init create............OK System recover configuration.................OK! Press any key to get started Login authentication Password: Password: Password: Login authentication failed.Please wait for 5 seconds. �DƬ �����N�ƽⷽ����uBoot���������^Console���ܴa���Ӻ���Console���ܴa �O���uBoot�ṩ���������^Console���ܴa���ӵĹ��ܣ��������Ñ�ʹ��Console�ڵ�䛵ĕr�����^�ܴa�z�顣�@��ϵ�y���Ӻ���˲���Ҫݔ��Console�ܴa�⣬�c����������ͬ��Ҳ������������ü��d���O�䆢�Ӻ���Console���ܴa��Ȼ�����á� �DƬ ���^�ܴa�z����ڰ�ȫ�L�U��Ո�ձر��������BootROM�ܴa�� Ҫ�M�뵽uBootҕ�D��Ҫ�؆��O�䣬�����I���Д࣬Ոҕ���w��r�����O�䔵����ݣ����M���x��I�����^�ٵĕr�g������ ���Console���ܴa��䛺�Ո�R�������µ��ܴa����t��䛳��r���؆�������Ҫ����ܴa����䛡� �ڴ˲����^���в�Ҫ���O���M����늡� �ô��ھ��B�Ӳ��؆��O�䣬���F“Press f or F to stop Auto-Boot……”��ӡ��Ϣ�r������“f”���I���ܴa���M��uBootҕ�D�� �ô��ھ��B���O��ķ���Ո��Ҋͨ�^Console���B���O�䡣 ��ͬ�汾��BootROM�ܴa���ܲ�ͬ�����w�Ʌ�ҊAC��AP��ȱʡ�Ñ������ܴa�� ��uBootҕ�D����defaultuser������Console���ܴa�� ar7240>defaultuser Start setting whether to Change Password..... Current Bootup Change PW is N Do you Want To Change The Default password,Y or N:Y ar7240> ��uBootҕ�D����reset����؆��O�䡣 ar7240>reset Resetting... ���ϵ�y���Ӻ�ͨ�^Console�ڵ�䛕r����Ҫ�J�C����䛺���Console���ܴa����̎�Ե���J�Cģʽ��passwordģʽ���ܴa��“huawei 123”������ <Huawei>system-view [Huawei]user-interface console 0 [Huawei-ui-console0]authentication-mode password [Huawei-ui-console0]set authentication password cipher Enter Password <6-16> ://��̎��ʾ��Ϣ���O�䌍�H�@ʾ��� Confirm Password: [Huawei-ui-console0]return ���˷�ֹ�؆������ÁGʧ������save��������á� ���٣� �DƬ admin huawei.com �DƬ ݔ��Ĭ�J��Uboot�ܴa �DƬ ݔ��defaultuserĬ�J������ �DƬ �DƬ �Ƿ�Ҫ�����ܴa���x��Y �DƬ reset�؆��� �DƬ �����Ӻl�F���������M��ϵ�y�ˣ�����Ҫݔ���ܴa�ˡ� �DƬ �����O���ܴa�� �DƬ �����ܴa��һ��Ҫsaveһ�¡� �DƬ ���Ŀ��Ԏ������������O�ú�������·������ |